How to Use VLC Media Player to Record Screen?

VLC Media Player is one of the most popular free and open-source multimedia players available today. Known for its ability to play virtually any video or audio format, VLC also packs several hidden features that many users are unaware of—one of them being screen recording. While VLC is not primarily designed as a screen recorder, it can be used to capture your desktop activity in a pinch. This makes it a convenient tool for creating tutorials, saving live streams, or recording other on-screen content without installing extra software.
In this article, we’ll explore how to use VLC Media Player to record your screen, as well as explore its advantages and disadvantages.
1. Can I Record Video Using VLC?
Yes, you can. VLC Media Player includes a screen capture feature that allows you to record the activity on your desktop and save it as a video file. This functionality is built into the application and doesn’t require any plugins or additional software.
2. How Can I Use VLC to Record Screen?
Here’s a detailed step-by-step guide to help you record your screen using VLC Media Player:
Step 1: Make sure you have the latest version of VLC installed by downloading it from the official site.
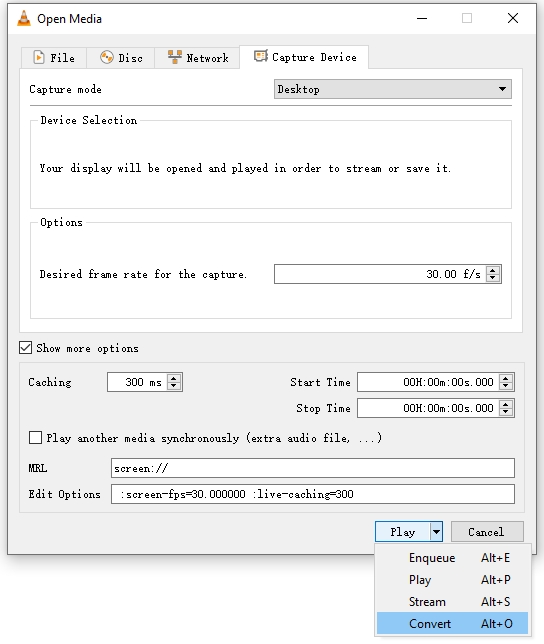
Step 2: In the top menu, click Media and then select Open Capture Device from the dropdown list.

Step 3: Configure desired capture options in the “Open Media” window:
- Under Capture Device , select Desktop from the drop-down menu.
- Set the desired frame rate . For smoother video, use 30 fps . Lower frame rates like 15 fps will reduce file size but also video quality.
Click the “Convert” button at the bottom (instead of “Play”) to open the Convert window.
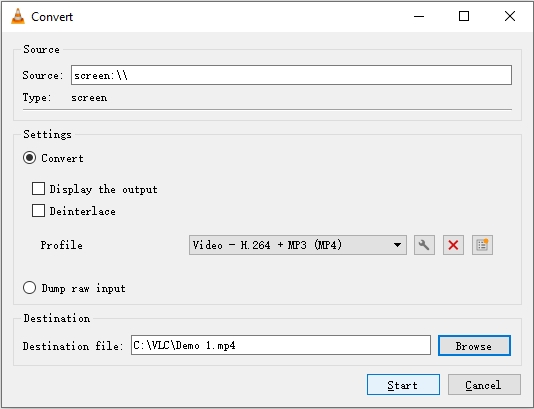
Step 4: In the Convert window:
- Click Browse to choose a file name and specify the location where you want to save your recorded video.
- Ensure the file extension is .mp4 for best compatibility.
- Choose the Video – H.264 + MP3 (MP4) profile from the list of conversion profiles.
Click Start to begin recording your screen. VLC will start capturing your desktop immediately.
To stop the recording, click the Stop icon in VLC, and the video will be finalized and saved to the location you selected earlier.
3. Where Does VLC Save Recordings?
VLC stores your screen recordings in the location you specified during the Convert step. If you didn’t manually choose a destination, VLC might default to a system folder, which could make it difficult to locate your file. It’s recommended to always click Browse and define a clear folder path and file name before starting the recording.
4. Pros and Cons of Using VLC Screen Recorder
While VLC can be a helpful tool for quick screen recordings, it’s important to understand its limitations compared to dedicated screen recording software.
✅ Pros:
- Free and open-source
- No watermark or time limit
- Lightweight and widely available
- Supports various video formats for output
- Cross-platform compatibility (Windows, macOS, Linux)
❌ Cons:
- No audio capture from microphone by default (requires manual configuration)
- Cannot record webcam
- No real-time editing or annotation
- No on-screen controls or timers
- Occasional performance issues or crashes during long recordings
- Clunky and non-intuitive setup for beginners
If you’re looking for a quick and free way to capture your screen without any frills, VLC is a viable solution. However, for more professional recording needs, a specialized tool is a better choice.
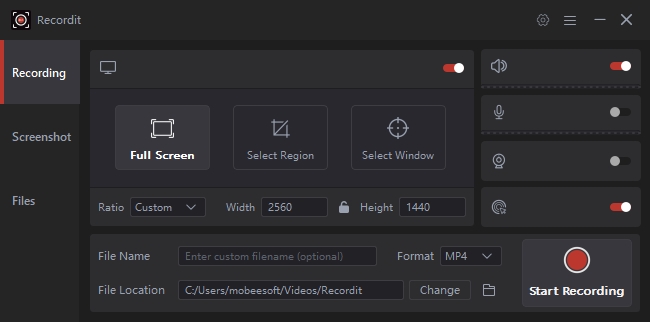
5. Try the Simple but Powerful Screen Recorder – Recordit
If you find VLC’s recording process a bit too technical or limited, you might want to try Recordit – a modern and user-friendly screen recorder designed for everyday use. Unlike VLC, Recordit was built specifically for screen capturing, which means you’ll have access to tools and features that make a real difference.
Key Features of Recordit :
- Instant screen recording with one click
- Record without losing frames or capturing black screen
- Supports webcam, microphone and system audio recording
- Export recordings in MP4, GIF, MP3, etc
- Lightweight and optimized for performance
Use Case Examples:
- Create tutorials or how-to videos
- Capture software demos
- Record virtual meetings
- Save live streams or webinars
- Turn recordings into shareable GIFs
Recordit is especially useful if you need to make frequent recordings or want higher video quality and more control over your output.
6. Conclusion
VLC Media Player is a versatile application that goes beyond just playing media—it can also be used to record your screen. For basic needs, such as recording a quick tutorial or capturing desktop activity, VLC gets the job done with minimal setup. However, it does have notable limitations, including a lack of intuitive controls, no built-in audio recording from your mic, and no post-recording editing features.
For users looking for a simpler, more powerful, and professional screen recording solution, Recordit is an excellent alternative. It removes the complexity, enhances usability, and ensures high-quality output with minimal effort. Whether you’re creating tutorials, recording meetings, or just capturing your screen for fun, Recordit offers the tools and experience VLC simply can’t match.